How About Drawers?

Drawer boxes need good slides, not dovetail joints

 What About Drawers?
Dovetailed drawers are pushed as the ultimate drawer for a kitchen when the reality is that they are as useful and needed as screen doors on a submarine.
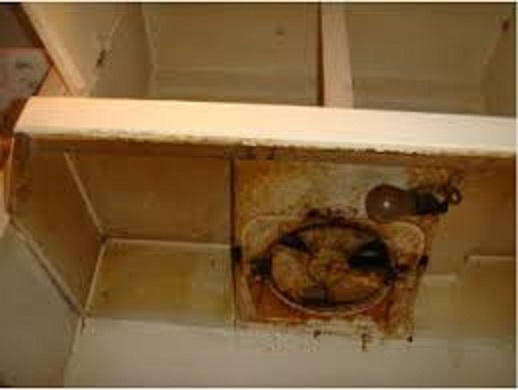
There was a time a hundred years ago that a dovetail drawer made sense as there were no proper drawer slides, merely waxed wood rails that would swell up just like the drawer box in damp weather and you could pull the drawer front off a drawer in time


Good Slides Make Good Drawers

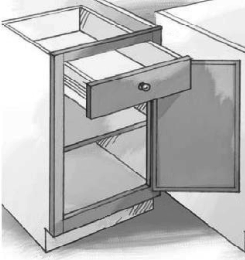
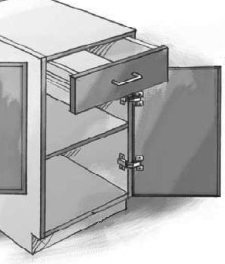
These days we have epoxy coated or powder coated slides with ball bearing mechanisms or nylon rollers coupled with sufficient clearance that a drawer simply isn’t going to stick. Or metal side drawer systems that stay flat and square with zero warpage and zero problems for the life of the home.
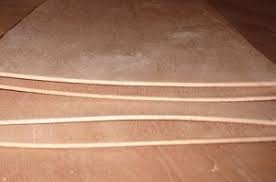
Many of the dovetail drawers being sold on the less expensive pre made cabinets are dovetail indeed, on a veneered MDF or particle board panel. Something that no decent cabinetmaker would consider using as a drawer side. MDF coupled with a metal drawer side is a much different animal, with steel ledges under and behind the MDF panel. One tough drawer, impossible to rack out of square when pulling the drawer open.

I can make dovetail drawers but dovetail drawers are notorious for being difficult to size accurately in width, something that is not good for a modern drawer slide. In fact, the old factories kept a half dozen huge sanders that could sand the sides of the drawers to hand fit each drawer.
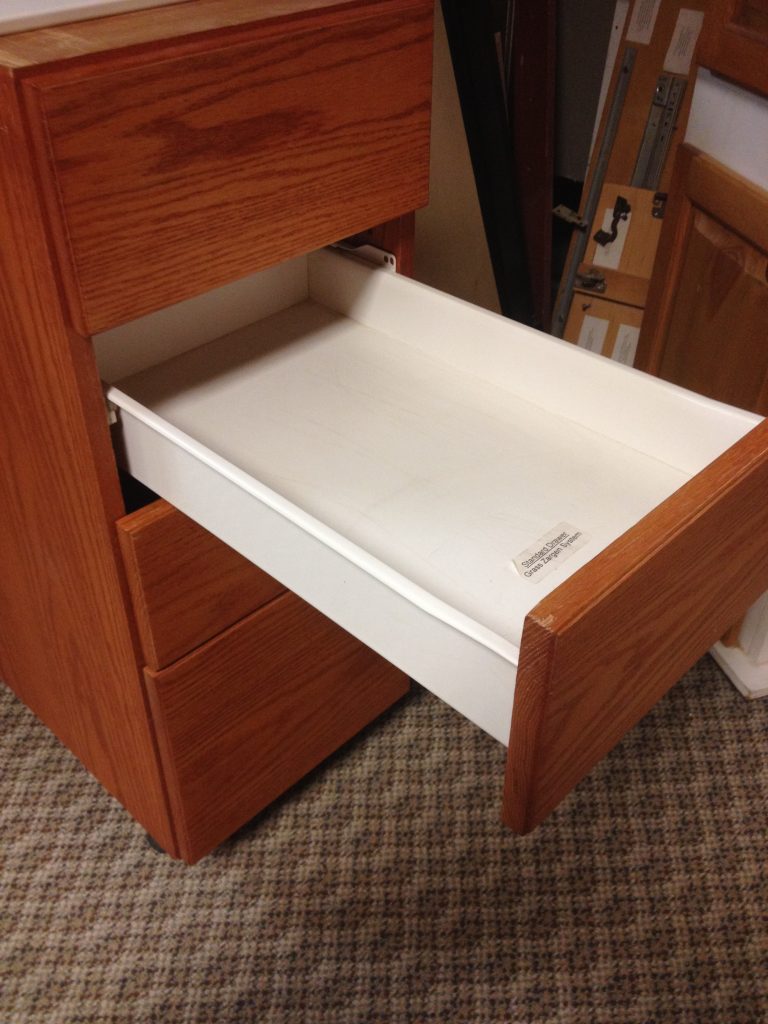
Dovetail drawers are a waste of time and money!  What does work well is a hardwood box, either popular or soft maple, planned down to 5/8″, with a 1/4″ plywood bottom dadoed into all four sides, with glued and nailed joints.  These need undermount slides which are a little more forgiving than the old KV side mount ball bearing slides that also tend to drop ball bearings over the years and require replacing in five to ten years with constant use.  Or stick with the metal side drawer box system with the 3/4″ thick bottom that has steel wrapped around three sides of the drawer.

More info on quotes!


Kitchen Design Principles


A lot of people put a lot of thought and design time into a kitchen, sometimes to the point they overthink the design and wind up frozen in fear. Others find a picture or design and say “That’s it.” There are some basic rules to keep in mind with a kitchen to keep your costs down and still get the changes your heart is set on.

#1. Thou Shalt Have Balance and Symmetry

Humans are used to things being in balance and symmetry. Something that is oversize in a small room or a jumble of sizes and heights seems untidy and un-orderly. A well balanced space makes people feel welcome and safe. People just know when something is off.

To balance a room pick the spot that appears to be the center of the room. Put one of your major items in the room in that spot, like a stove and hood and attempt to build outward with similar sized cabinets or appliances on either side. Or if you have a large fridge and a large built in oven put one on either side of the run of cabinets so the visual weight of the large items are at either end. Of course that can also close in a kitchen so that needs taken into account as well.


Learn more Here at this link

Design Principles

  • Balance and Symmetry.
  • Focal point on the main wall
  • Avoid moving walls or major utility lines
  • Scale and proportion are important


Pure symmetry isn’t required, sometimes color can help balance out a run of cabinets if the tyranny of geometry force you into limitations on where things go.

#2. Thou Shalt Have a Focal Point

Walk into a room and see what draws your attention at first glance. That is the focal point of a room. First impressions count, so an item that jumps out sets the tone on how you look at the space. Kitchens generally will use a focal point hood, a somewhat generous sized hood with either ornamentation or a bold color to draw the eye and tell visitors the story you wish to tell. If there isn’t room for a large hood a very bold countertop or backsplash will do. Make that the dominating feature of the room and don’t let other areas compete for attention.

#3. Thou Shalt Not Move Walls or Major Utility Lines

Moving walls isn’t cheap. Many times these walls might not be carrying any roof load but might be carrying the ceiling joists that carry the weight of the ceiling and insulation. Generally any wall that runs across the ridge line of the house is going to be a non load bearing wall and the walls that run in line with the ridge line are likely to be load bearing.


Why? Because ceiling joists are usually used to prevent the ridge line and rafters from pushing the walls of the house out and falling down. These joists are used in tension to prevent the walls from spreading. The best way is to grab a flashlight and get up in the attic and investigate.

Moving a load bearing wall means substituting a beam to carry the load, either above the ceiling or below. Below is best and the deeper that beam the longer the span you can bridge without causing problems with sheet rock cracking years down the line. Running a beam above is possible with a steel beam and plenty of steel strapping but they are far more prone to settling and cracking as time goes by. Plus the cost of fixing the drywall and flooring after moving a wall. Sometimes there is no choice but try to avoid moving walls.
 

Learn more Here at this link


Utility lines like stove gas lines or heavy gauge wire cables for a stove or oven are likewise expensive to move. If there is enough slack in the lines you can move the stove location toward the breaker box but moving it further away means replacing the entire run of cables and thick copper cables are expensive. Avoid the idea of using a junction box in the attic, the connections do heat up and loosen up with time and use. You could put a disconnect but a direct un-interrupted line is best. Gas lines are a bit more forgiving as you can thread on more joints of pipes easily enough as long as a plumber does the work and a pressure test is done on the completed work before trusting it not to leak. Consider the exhaust fan too before moving a stove.

#4. Thou Shalt Have Scale and Proportion

Six inch crown molding looks great in large rooms but not so much in a cramped kitchen. Cabinets and appliances ought to be scaled to fit the room. A 48” Sub Zero fridge looks amazing in a large kitchen but completely out of proportion in an apartment sized galley kitchen. If you want that monster 12′ long island make sure you have a monster sized kitchen so you have enough walk way room.

.


#5 Thou Shalt Not Ignore the Kitchen Triangle

The kitchen triangle is the distance between the fridge, the sink, and the stove. You want the three measurements to be more than16 feet if at all possible and less than 24 feet. Why? Because you use all three appliances for preparing food. Too close and only one person can work in safety without bumping into others. Too far and you wear yourself out traveling back and forth. The prep area, clean up area, and serving area ought to be separate areas if possible. Try not to have people doing clean up chores competing with space with the cook or have the dirty dishes and food waste disposal crossing over into the serving area.

#6. Thou Shalt Not Allow Civilians Into the Work Areas

Visitors and kids like to hang around a kitchen but they need to have their own place out of the way of the cook for safety and sanitation. Give them a place to gather and watch the cooking but be able to be out of the way of the cook.

Learn more Here at this link

#7. Thou Shalt Have Landing Spaces

Landing spaces are areas, usually countertops, where items can be set while in use or before storing away. Every cooktop or stove needs a small countertop on either side for pot handles to stick out over or for placing a spatula or bag of fries about to be dumped into a pot. One cardinal sin is to allow a pot handle to jut out past a stove or countertop, just waiting for a kid to grab on to or bump into. The fridge needs a space to set a bag of groceries before unloading them into the fridge. As you with draw items from a fridge you need a place to set the items as you assemble the ingredients for your meal.

#9. Thou Shall Be Able to Get the Refrigerator Into the Kitchen

And yes, this has actually been known to happen. A lot of fridges are over 36” deep and houses have been built with 32” doors leading from a hallway or garage with an island hogging up the space on the other side to the point a fridge can’t be wheeled into place. And many older homes have front and back doors that are less than 36” wide so check before you purchase that huge fridge.

.

#10. Thou Shalt Not Mix Appliance colors.

Consistent colors and brands in a kitchen make it look planned and neat. It is penny wise and pound foolish to re use an old cooktop that might not have a lot of years left in it and have a major problem with the cut out not being the right size when the old cooktop dies on you. And a piecemeal look to the appliances screams cutting corners when you go to sell a home.

#11. Thou Shalt Not Stint on Electric Outlets or Lighting

Modern kitchens have loads of gadget and small appliances. At least two 20 amp circuits are needed for a kitchen just for the lighting and outlets alone. Run the garbage disposal and dishwasher and the fridge on their own circuits. The oven or cooktop will have its own circuits, usually 220 volts. There are under-cabinet strip lighting that is reasonably priced if you only have a few outlets and they can be wired directly into the side of the existing outlets if you have enough power coming from the breaker box.

Learn more Here at this link

Lighting is crucial too for a bright kitchen that is a pleasure to work in. Modern LED lights are a lot better than the old incandescent can lights that put out a lot of waste heat. Get some task lighting over the sink and island if you have one. Lighter colored countertops and cabinets help bounce the light around and lighten up a room. Some inexpensive rope lights can be tossed up above the crown molding for a nice look and LED under cabinet lighting will help show off that gorgeous back-splash.

#12. Thou Shalt Not Leave Out a Hood

Vent hoods are a necessity to get odors, smoke, and grease out of the house. If there is no way to get a 4” duct (solid pipe, not spiral pipe!) out of the top consider a down draft cooktop and run the vent out below the cabinets. Modern cabinets will have 4” tall feet and you can go taller if needed with the appropriate length feet.

#13. Thou Shall Think About Cleaning Bead board…. years ago and put bead board panel doors in my kitchen and found out that it was heck to keep clean and every time a dust rag or sponge looked toward the bead board fibers magically appeared stuck in the bead board splinters and cracks. Tough to keep clean, tough to keep a finish on the panels due to moisture seeping into the cracks.


.

#14 Thou Shalt Not Forget the Trash

Fact of life, we throw away lots of waste and a kitchen needs to plan for the disposal. The trash can needs to be close to the sink so waste can be scraped but also easy to get to by others than the cook. You don’t want people constantly coming into the kitchen triangle to use the trash can so put it out near the edge of the triangle if possible.

Double bins are nice, one for trash and one for recyclables. They make huge honking four bin units but not that many people have enough recyclables to sort at the trash, better to assign that chore to the garage.

Garbage bins need to be sized to the size of the family and frequency of dumping the trash. Too large of a bin means old stinky garbage piling up. Too small means too many trips to the outside trash bin. It isn’t a good idea to put a drawer over a trash can either due to the smell that can build up.Finally, top mounted slide out trash cans are more stable and stay aligned instead of the bottom mount which tend to look crooked after a few months of use.


Learn more Here at this link

#15. Thou Shalt Not Succumb to Kitchen Porn

Yes, kitchen porn, those exciting and glamorous ideas that look great in the air brushed and carefully curated photos and videos but in real life show a seamy side to things.

We are talking glittering granite that soon becomes cracked and stained, gorgeous slate backsplash that tends to fall off the wall as it de-laminates.

Or that beautiful butcher block top that is really truck flooring that quickly turns into a splinter generating monster that warps and twists and stains with little Timmy’s first dumped Kool-aid pitcher.


Open shelving is sexy till you figure out you don’t have a lot of stuff that is pretty enough to leave out in the open or how long it lasts unprotected or how much time it takes to keep it dusted and the grease off the surfaces. You will tire of the visual clutter and bemoan the lack of storage space that would have been available had you avoided those open shelves.


How about that gorgeous copper sink with the beautiful patina that quickly goes away with scrubbing or toothpaste? Or that lovely “granite” composite sink that soon looks like a battle ground with dings and scratches and etching not to mention the chipped corners if you use a negative reveal edge or mud ugly silicone caulk that molds or turns white after a few month

Such things sure are exciting and breathtaking to think about but won’t last, aren’t real, and won’t be around for long.


.


Is the Carpenter Shop a Better Business Bureau Member?

How things are done series

Absolutely not! The BBB like many review companies has degenerated into an extortion racket aimed at businesses at best and a way to lull consumers into ignorance and compliance. The best story done on the BBB was ten years ago in 2010  by the ABC 20/20 investigative news show. The story had small businesses wear hidden camera and visit the BBB office where they were told they could trade their C rating for an A rating by paying $425.00. The businesses had a C rating due to old, resolved customer complaints. A local business group gathered the $425.00 from a few members and listed a new non existent business called “Hamas” and received a A rating the next day.  Yes, a terror organization received an A rating from the BBB.

But if you do file a complaint against a business with the BBB what happens? Well here is a good link to one good description. What happens is that the local BBB sends a generic letter with the customer’s complaint asking for a repy and offering the chance to join the BBB for the regular fee. All a business has to do is send back a generic letter in reply, without even addressing the issue and the complaint is marked responded to and resolved. At least that is how it worked 15 years ago. These days that still works for BBB member companies but not for non BBB companies. Instead you will be deluged with BBB letters and emails and phone calls offering to sell membership to resolve the complaint.

How We Build Cabinets

The BBB is a pay to play review company

  • “accredited” BBB members pay $425.00 up to thousands of dollars to join
  • Customer complaints by “accredited” members can be “resolved” and removed with a generic “Din do nuffin” letter
  • Non BBB member businesses get bombarded with phone calls and emails trying to sell “accreditation”.
  • Companies will be held hostage till they pay for “accreditation” upon after paying the complaints are removed from the company’s BBB profile


Most business groups give poor ratings to the BBB  due to their pay to play practices. The Carpenter Shop has one complaint on the BBB, from a customer that purchased almost $500.00 in chicken feeders, then the husband of the customer called complaining about the length of the lids (standard length, all are the same) and the fact that he had to assemble them. Of course he wanted a complete refund including shipping and when that was confused he filed a “not as described” complaint with PayPal and when that didn’t work he had his credit card company reverse the payment claiming he didn’t order the feeders. And kept the feeders of course. Then filed the BBB complaint saying he had been cheated.

The BBB rakes in hundreds of millions of dollars per year running this protection scheme. The money comes


How things are done series

mostly from their “members” who pay between $425.00 and $10,000 per year for the coveted BBB “approval”. They can also purchase plaques to hang on the wall in their businesses and door stickers and preferential placement for ads placed on the BBB website. To bring in new businesses the BBB hires commission salespeople, paying up to one third the “accreditation fee” to the salesmen. Marketing companies run call centers packed with aggressive salespeople, using filed customer complaints to extort the businesses into paying for membership in the BBB. Many of the BBB companies are using marketing agencies that have F ratings on the BBB’s own website!

The BBB itself is an umbrella organization that sells independent bureaus across the U.S.. It collects a few thousand dollars a year from small BBB offices up to $200,000 a year from the larger city BBB offices.

Many of the rating services like the BBB and Yelp have sordid reputations for pay to play schemes so businesses have begun simply ignoring the ratings. Both companies remain in business simply by providing safe harbor and polished reputations to businesses willing to pay handsomely for those reputations.


How We Build Cabinets

Luckily Google and Facebook appear to have refrained from becoming so blatant and while Angieslist.com appears to still provide reasonably accurate reviews from customers they did start burying company reviews behind paid advertisers even if the paid advertisers have lower ratings on Angieslist.com. Generally you can still look up a company on Angieslist.com but non ad buying companies do not show up on their list of recommended businesses.

The Carpenter Shop has an A rating on Angieslist.com and a 4.7 star rating on Google (five stars is the maximum rating on Google.). We have a single five star review on Yelp but it is hidden and accessible only if you click on a greyed out link. It seems one customer placed the review twice and despite her sixteen total reviews Yelp won’t show the review because we refuse to “advertise” with them.


So with the review companies it is a mixed bag but the BBB is only for crooked companies willing to pay to play.


Commercial Work, Yes We Do!

We do  a lot of Commercial work, some hass been done for fast food joints like Burger King, interior wall cladding , chair rails, and window sills, store fixtures, and sales counters. This week a store counter for a drywall supply company is being made. Unfinished store fixtures will run you $200.00 a foot and up. The basic no door, few drawers sales counter that is open in back with shelves will run around $100.00 per foot for the basic cabinets and if you put finished ends and front you are looking at starting around $15.00 per square foot for a red oak plywood end panel cased out with red oak board trim. A five part paneled back will run around the same. 

Most of the time the cabinets are made in sections, disassembled for finishing, reassembled for inspection prior to delivery, and disassembled again for transport and installation.


Learn more Here at this link

Commercial Work

  • Generally good quality but lower than retail standards.
  • Durability is important, lots of abuse from employees
  • Contractors generally won’t like working with us as we require deposits, harder for the contractors to cheat the subcontractors that way
  • The finish needs to be tough as nails and any countertop needs to be something like solid surface so you can re-polish the top  every year or two


Modular construction works well in case you remodel the store or change buildings, you have a fixture that can be transported on down the road. Usually the panels can be replaced too if you wanted to spruce up the store five or ten years later without losing the basic cabinets.

Finishing generally costs 25% of the price of the unfinished cabinets for stain grade work, 35% for paint grade work although paint grade cabinets are a little cheaper due to the paint grade materials used so it pretty much washes out on cost between paint and stain grade.


Will You Come to My House for a Free Estimate?

How things are done series

Free?  Nothing is free except trouble and it has costs that you just haven’t seen yet.  All services including shipping is either built into the product or added to the final selling price.

If a cabinetmaker comes out to visit your job site or home he either includes his labor and overhead costs into your job price or he hires a salesman or kitchen designer and pays their labor, insurance, payroll taxes, and business overhead into the price of the cabinets. 

The shops or stores that offer “free” estimates are adding plenty for sales acquisitions and the time and expense of visiting job sites to acquire the job.   Many times the salesman or kitchen designer is on commission, usually 20% mark up of anything they sell to the customer.  A designer might add some value, especially for a customer that believes they have poor taste or judgement.  But you know, most people like what they like and most tradesmen are going to look out for you and talk you out of flying pig ceramic tile backsplash or other choices that will either date your home or lower the resale value.  Higher end homes are usually an exception as they are marketed to very picky homeowners.  For the average person, a designer isn’t needed and the profit motive is removed from recommendations for products.  After all, salesmen will want to sell you a $500 faucet and make $100 commission than a $100 faucet that nets them $20.00, just human nature.

Learn more Here at this link

Costs involved in bidding or selling a job

  • Time and overhead burned up walking customers through options
  • Travel costs and time and overhead visiting job sites
  • Time and overhead spent producing drawings and changes to the specifications and drawings
  • Research time on items such as appliance specs
  • And the actual bidding of the job once the specs are nailed down and any changes afterward.


There is no escaping these costs and yes, they will be passed along.  So the better prepared the customer is the final cost of the cabinet job.

The commissioned salesmen will travel out to your home at the drop of a hat and might make twenty bids before they land a sale.  Why?  Because they spend so much money on selling a job and have to recover all the costs of bidding, traveling, and selling the nineteen jobs they failed to land.   We believe this is not fair.

So we ask customers to bring in their crude drawings and measurements, tour the showroom while we talk about options and costs.  The more sure the customer is about what they actually want the lower their final cost will be. Once we have an estimate based upon the specifications (specs) we can quote a price and visit the job site to confirm all measurements so that any mistake past that point is our mistake and our cost to make right. In the end the customer saves money and gets better cabinets.


Flooded Home? Can you Save the Cabinets?

How things are done series

Kitchens flood, we count on it happening at least once in a kitchen’s life and we design so that a broken water line, fridge water line, or washer water hose doesn’t ruin all of the cabinets. The cabinets are set up on 4” tall feet so at most the toe kicks and end panels will take the brunt of the damage and they are easily replaced by design in our cabinets, not at all for face frame style cabinets where the doors are an integral part of the cabinet carcass.

We have had only one case to deal with, where a 3/8” copper prep sink water line broke loose after seven years. it sprayed two doors for hours till the customer woke up and was greeted with a half inch of water in the home. The wood floors were ruined and needed replaced but the cabinets cost a bit over $500.00 to put back in first class condition thanks to our construction methods.

But with Oklahoma flooding in May of 2019, we need to talk about flood water damage versus clean tap water that is a half inch deep at most. When homes are built the studs are 92 5/8” tall and three layers of 2 x 4 plate are added, bottom plate, top plate, and an extra top plate to give the proper height. That puts the height of the actual wall or ceiling at 97.125” tall before the sheetrock goes on. Then you are down to 96 5/8” from floor to sheet rocked ceiling. Two 48” wide x 96” long sheet rock sheets are added leaving a 5/8” gap at the bottom and that saves your bacon. 

How We Build Cabinets

Flooded Cabinets Will Have Finish Problems Down the Road

  • The wood will never be as dry as it was before after kiln drying
  • Water will eventually escape and blister or flake the finish or cause blush
  • Blush is a white looking semi transparent effect under the finish
  • Floors and walls behind cabinets will mold if the old cabinets are not taken out


But in a flood all sorts of stuff is in storm water runoff. Animal excrement, human excrement, lots of mud, oil, and chemicals. And the water is high so it soaks into the sheetrock, is wicked up into the insulation and wood framing, leaving behind all of the contaminates when it does dry. Including fungus, bacteria, mold spores, and of course the mud and oil.

If you have a clean water flood you might be able to salvage the cabinets IF they were built up off the floor on nylon legs and you get the water out quickly. Particle board of course isn’t going to survive. First, empty your cabinets and remove as much excess water as possible inside the cabinet using towels or sponges. Pull the doors off and lay them around so both sides are exposed to the drier air, might not warp as much. Get fans going in the house and a good dehumidifier going if it is humid outside and close off the house so you can dry out the air inside the home quickly. A wood stove puts off lots of dry heat, not so much for a vent-less propane or natural gas space heater, water is formed with propane and natural gas is burned.

How things are done series


If you can find the original cabinetmaker some cabinets can be repaired and the ones damaged beyond repair can be replaced. The finish might need stripped and water stains removed using oxalic acid, then treat for mold using bleach and water. If you do not do this the cabinets will begin to stink. After the cabinets have dried thoroughly for several days refinish the cabinets.

Now whether or not the cabinets will come through this process as good as new depends upon how much water and how long it soaked in and how quick you get the water out. Wood will never return to its kiln dried moisture content after being flooded. Water will cause finishing problems on down the line as the home heats up or the air dries out and the wood attempts to stabilize moisture content with the surrounding air. That causes finishes to flake off.

How about the Professional Restoration Companies?
They will have better fans and dehumidifiers but in the end they sell a service to insurance companies to try to limit the cost of a claim. The insurance company wants them to try to salvage the cabinets, even paying half of the cost of the ruined cabinets to clean them up and refinish will save the insurance company millions of dollars each year.  And a year later when the finish flakes off it isn’t their problem. Even on the Edmond kitchen with little water damage, we did replace the doors that took the direct spray of water for six hours.


How We Build Cabinets

Repairing and Replacing Part of the  Cabinets is Problematic

  • Finding the original cabinet maker or one that has the tooling to match doors and cabinets is tough
  • A stripped finish will stain out totally different than new wood on the replacement cabinets
  • Bleach and water and oxalic acid and water adds more moisture to the already wet wood
  • Insurance saves a lot, you get sub par cabinets with a portion of the lifetime use used up already

 And have never had a call back saying anything bad happened with the kitchen. But sanding and striping those doors for re finishing, well, that would be ill advised given the cost of the new doors and finishing was close to the cost for slap dash work to save a few dollars for the insurance company.

If you Google flooded cabinets the restoration companies will talk about using wood glue to fix delaminated plywood and adding braces to strengthen weakened cabinets. Not good long term, you know that. And the floor and drywall behind the cabinets is likely to mold unless the cabinets are removed for drying the wall and even replacing the sheetrock. A month of drying and dehumidifying will help if you have the time.

But is it better to save the insurance company a few thousand dollars or you be made whole with cabinets that will return your home to its previous value?


Face Frame Cabinets
Frameless or European Style

What is the Difference Between Face Frame and Frameless Cabinets?

How things are done series

Face frame is the narrow border that runs around the face of an old style cabinet and between the drawer and the door.  The idea is that it adds some stability to the cabinet, increases the racking resistance (sideways force).

The problem is that the old style face frame cabinets are very labor intensive and the cost and other drawbacks do not make up for what little racking resistance is added.  After all, once cabinets are installed most are fastened to a wall and most are trapped between walls, racking resistance is hardly needed.  But it was how cabinets were built back in the day.

Then World War II happened and not only were most of the cabinetmakers dead or disabled, most of the other skilled workers were gone too. And there were millions of homes in bombed out cities needing cabinets and needing them quickly.  So frameless cabinets were invented. You can use more technology to build frameless cabinets because of the system holes, a series of holes 32 mm apart, are used to hang drawer slides, hinges, and shelf pins.  Parts can be made with precision and they will fit without being adjusted or fitted by hand.

Learn more Here at this link

Frameless or Euro Style has Benefits

  • Easier to produce with the right equipment
  • around 20% additional accessible storage
  • easier to clean, hardware more solidly attached
  • Must be accurate due to tight tolerances needed


Face frame cabinets usually have drawer slides hung on plastic brackets or flimsy wood U shaped dividers, frameless cabinet slides are solidly attached to the side of the cabinet, no bending which causes drawers to drop out of track.

The only downside is the precision needed on frameless because of the super tight reveals or distances between the doors and drawers.  Face frame doors and drawers, get them within a quarter inch and no one will see the differences because of the wide spaces between the doors and drawers.

We started doing frameless or Euro style cabinets in order to slash the labor costs on our work.  Because of that we didn’t have to raise prices for about ten years.  And it is easier to train workers for Euro style than the older face frame cabinets.


Getting an Estimate

Drawings can be very simple and crude

 The crude drawing above was done in a few minutes.  A 120″ wall and a 96″ wall in an L configuration.  The ceiling height is marked down, and there are rough elevations showing how the cabinet boxes are set.  The window is located from the  right side but it really doesn’t matter which side is used to measure from.  The drawing does show open space on each end of the L shaped kitchen,, that is important, or if there is a wall there we need to know that the set of cabinets has to  fit in a confined area.


Not a lot is needed for an estimate

Measurements?  Get close, we will double check anyway.

The main points are to show how the walls are arranged, measurements locating windows and doors or other things that need to be considered, ceiling height, and a basic idea on how you want the cabinets arranged.

No need to spend a lot of time, a pencil sketch will do fine.  There are room planners online and kitchen planning, most are free and easy to use. 

Some things are assumed like placing the sink under a window or in the middle of a peninsula if there is no window.  We usually don’t move sinks or stoves very far to avoid costly wiring and plumbing changes but they can usually be moved  ten to twelve inches if needed.  

Appliance sizes are needed as well as what kind of sink will be used so the sink cabinet is large enough.  Links to appliances help but the exact specifications can be found later. A few notes describing anything special helps and sending pictures of other kitchens helps as long as you identify exactly what you like about the picture.   The kind of cabinets matters, if you see something off our website right click on the picture and “save as” and send it to us. We will call  if there are any questions.

More info on quotes!


Cracked Mitered Doors

That Was a Stupid Idea….

There is always someone looking for a cheaper way to make things, and I said cheaper, not faster or better.   Cope and stick doors have been around for hundreds of years with the original joints being hand made with hand tools.

We got faster thanks to the industrial age, motors and shaped steel cutters that hogged out the profiles much faster than a molding plane pushed by hand.  But it is still time consuming to make a good joint. 


And tear out, the bane of woodworking, the splintering of the back side of a board when cutting, routing, or shapering as the cutter comes to the end of the board on the edge of the board.  Well, rails, the horizontal parts of a door, which are called the cope, are all edge grain so one edge usually splinters so you have the stick part that leaves a shaped perimeter around the inside edge of the perimeter of the door.

Ditto on the shaping of the edges of the doors.  the trailing edge chips so you have an angle door edge to remove that chip and you have to pass the door back through the shaper  on a large percentage of the doors to remove any end grain chipping.

Learn more Here at this link

Give me Your Checkbook Till We Leave the Store…

  • Mitered doors sure are purty…..
  • Picture frame joints
  • Very deep profiles that are impossible using normal methods
  • They will crack at the joints and open up either on the toe or the heel of the joint as the humidity changes


So someone, a machinery maker no doubt wanting to sell new machines to replace the perfectly good old machines in the cabinet shops, came up with the idea of mitered doors.   The rail and stile stock is all identical, cut at a 45% angle on miter machines that can do both cuts in one operation, with some sort of biscuit or loose tennon  inserted to make a glue joint.  Sometimes machined in place using CNC routers.

Then a minimum wage worker slaps some glue in the hole and clamps them up and shoots a pin nail in the joint and removes them to assemble the next door.

The problem is systemic, wood shrinks across the grain so anything you miter together will shrink and show a gap at the toe or the heel of the corner.  That cracks the paint, shows an ugly gap, and of course the shrinkage breaks the glue joint leaving it just a matter of time before the doors fall off the cabinets.


At best it is just the majority of the door joints cracked and looking shabby.  But hey, someone made some good money selling those doors to the homeowner and is it their fault the homeowner was uneducated?  I say it is the shop’s fault but if you already invested in the equipment you gotta make it pay off.  Cope and stick doors might crack on a few doors but they will not ever fall apart if property machined, properly glued, and clamped.


Tile Countertops

That Was a Stupid Idea….


I learned this one the hard way. Luckily it was my first “home”, a trailer house.  Even then it got ripped out a few months later.

“But they have used tile for decades in the older homes.”  Yup, with a 2″ thick concrete base, not glued on some plywood with mastic.

Tiles crack unless the base is thick and massive.  Add to that the chipping and grout cleaning, well tile countertops do not age gracefully

The edges fall off when bumped, they always look dirty and the grout flakes out plus you don’t want to think about the amount of bacteria hiding in that grout.

Learn more Here at this link

But it is Cheaper..

  • True, the first time you put it in
  • Not so cheap when you have to replace it
  • Yup, you can put hot pots on it, the one grace it has
  • Going to devalue your home when you go to sell


A tile top could be made for a few hundred in materials but if you hire the job done you will spend $500 at a minimum and more likely $1000.00.  That will make a good sized payment on a solid surface top that will last the life of the home or until you are sick of looking at the kitchen.  Or you can purchase a laminate top for that kind of money.

Tile on the backsplash works, up out of the way, no one cutting or pounding on it to break up the grout.  Away from most stain other than some spattered grease and oil, so seal several times a year. 

Glue surface areas are like  beams in engineering terms, half the depth or surface area, four times less holding power or strength.  Coupled with the angle of the annual rings and you can have some warped top rails that move so much that the elastic qualities of the glue fail and the glue joint fails.


Bead Board Doors

That was a stupid idea….

With any luck you were smart enough not to Google kitchen porn before you clicked on this category.  Gonna need to wash out those eyes if you did and clear your web browser history before grandma or one of the kids picks up your tablet or laptop.

Kitchen porn is that which is sexy and exciting but has no lasting qualities.  It is a bad idea personified, your nemesis that will lure you onto the rocky coast of kitchen remodel remorse.    You find it in national magazines and at the big box stores or through advertising that has a purpose of fleecing you of hard earned dollars while keeping the costs down on what they spend to do your remodel.  Money in their pockets is the goals and if you tire of the monstrosity, well they make money again replacing what they sold you.

Learn more Here at this link

Put Down the Beadboard Door Sample…

  • Sure is purty…..
  • Crevices fill with grease and dirt over time
  • Few sheets are true 1/4″ thickness or good two sides
  • Usually has fibers crushed during manufacture


Beadboard is interesting and lots of folks wander in asking about using it in the door panels.  The problem is that food, grease, lint, and fibers build up on the grooves over time.

The sheets are usually made with a soft tropical hardwood as the core and ran through grooving machines using roller dies to smash the wood fibers into the bead shape.  This leaves a jagged edge that catches fibers out of any cloth used to clean it and the sheets are not true 1/4″ most of the time so there are gaps around the perimeter of the door panel to store more gunk.

And no, you can’t pile on enough clear coat or paint.  The coating will flow right around the sharp points and surface tension will cause it to not fill the defects.


Five Part Drawer Fronts

That was a stupid idea…..

Five part drawer fronts, no, no, no, and no.

The narrow drawer fronts on the cabinet set to the left are five part fronts. Why are they named that?  Two stiles, two rails, and a center panel.  Five parts.  Just little doors actually, made the same way.

They are not good for several reasons.  First, that tiny little strip of material in the middle, the worst place to put a pull by the way, means the rails (horizontal parts) have to be less than 2.625″ wide, a standard quality rail/stile width.

Narrow boards tend to warp much easier due to the less width of the part.  Fewer annual rings in the part and there is a magic number on width, too many annual rings and you have cupping of the lumber.  Too few and all the annual rings are of the same angle and the part turns trapezoid shape across the width as it ages.

Learn more Here at this link

Betcha they will warp and the joints will crack..

  • Standard drawer front is 6.1875″
  • Minus 2.625 x 2,  means 5.25″ of rails
  • Center panel only 7/8″ wide
  • Looks stupid Forrest. Just saying….


So, “cabinetmakers” try using narrower rails, 1.5″ instead of the normal 2.625″.  About 1/2″ of each rail is grooved away, leaving a normal width “cheek” on the end of the rail at 2.125″ x .5″ surface area.  That is what is glued to hold the drawer front or door together.

Taking that rail width down to 1.5″ means 1″ x .5″ of surface area to be glued.  That is half the surface area of a properly sized rail. 

Glue surface areas are like  beams in engineering terms, half the depth or surface area, four times less holding power or strength.  Coupled with the angle of the annual rings and you can have some warped top rails that move so much that the elastic qualities of the glue fail and the glue joint fails.

But they sure are pretty in the magazines and in the showroom.