
Finishing
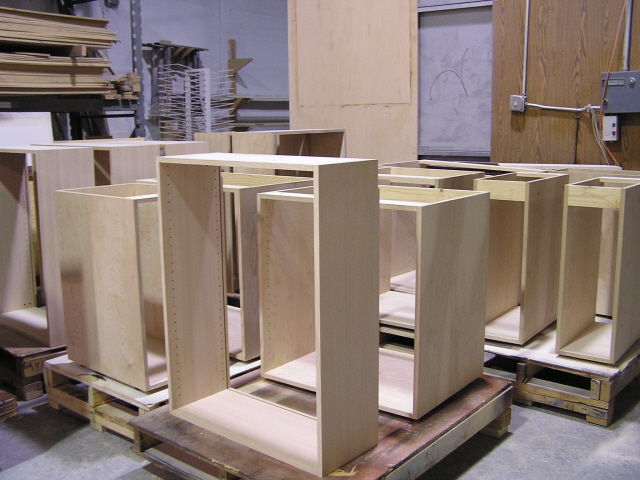
We do a really good finish and we are one of the rare Oklahoma City cabinetmakers that do our own finishing. The cabinets go through a pre finish inspection by the customer, laid out on their backs in order with drawer fronts and doors and other parts just laid in place. Hardware gets installed after the finishing process.
Finishing Essentials
- Quality pre cat lacquers and undercoaters
- Quality equipment
- A spray booth and a really, really big shop so the sawdust settles out before it gets to the spray area
- Above 50 degree temperature with no wind to blow contamination into the finish
- A finisher in charge, not a house painter
Once the customer approves the work they pay the second half of their unfinished cabinets and the cabinets are loaded on carts and the flat parts go on drying racks and into the finishing department where everything is cleaned of dust and checked again for defects or nail holes that need filling.
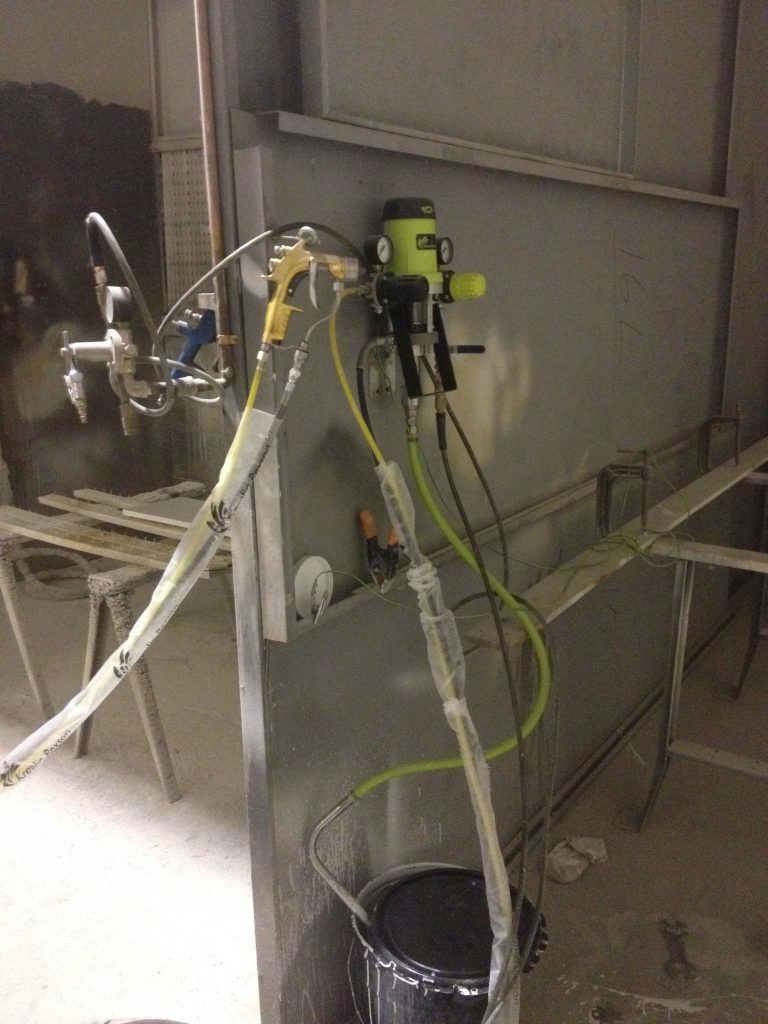
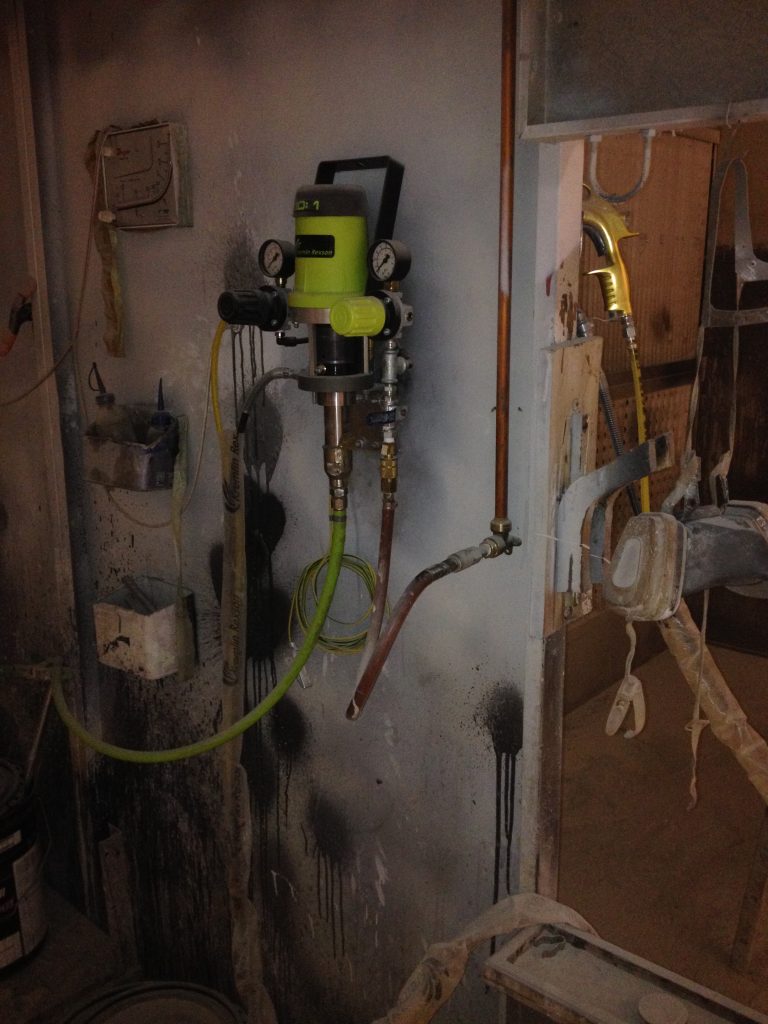
The two spray guns to the left if you are viewing this on a laptop or desktop are Kremlin Air Assisted Airless spray rigs. These don’t come cheap, $4,000.00 each and we have three spray rigs. They lay down a super fine finish as the paint or clear coat is atomized by extreme pressure assisted with an air fan to lay down a smooth coat
Spraying is done using multiple passes to hit the edges and crevices that might be in the spray shadow on a previous pass. Usually three passes per side, then spin the part or
walk around to another side and another three passes till all sides are covered, then the center is sprayed if needed. After everything dries the parts are flipped over and the other side is sprayed and the parts are racked in the drying racks to cure.
Why is it rare for a cabinetmaker to finish their own cabinets? Simply because as the plumbers say, poop runs down hill unless it is pumped. Meaning, the cabinetmaker can get away with less sanding and less quality as he is passing the work off to the painter as they will be blamed on those rare jobs where the homeowner or builder knows what quality looks like. Each blames the other, while the builder or contractor spends time convincing the homeowner that the quality is normal and nothing to complain about.
The lacquer based products dry quickly in warmer weather or in a few hours in cold weather and they are ready to sand. It is more wasteful in materials than hand finishing but lacquer products dry in the air if they miss the wood and fall to the ground as lacquer dust that can be swept up and recycled into low quality finishes. We use the dried lacquer dust for our chicken feeder treadle painting by adding lacquer thinner to the lacquer dust. The only parts that get
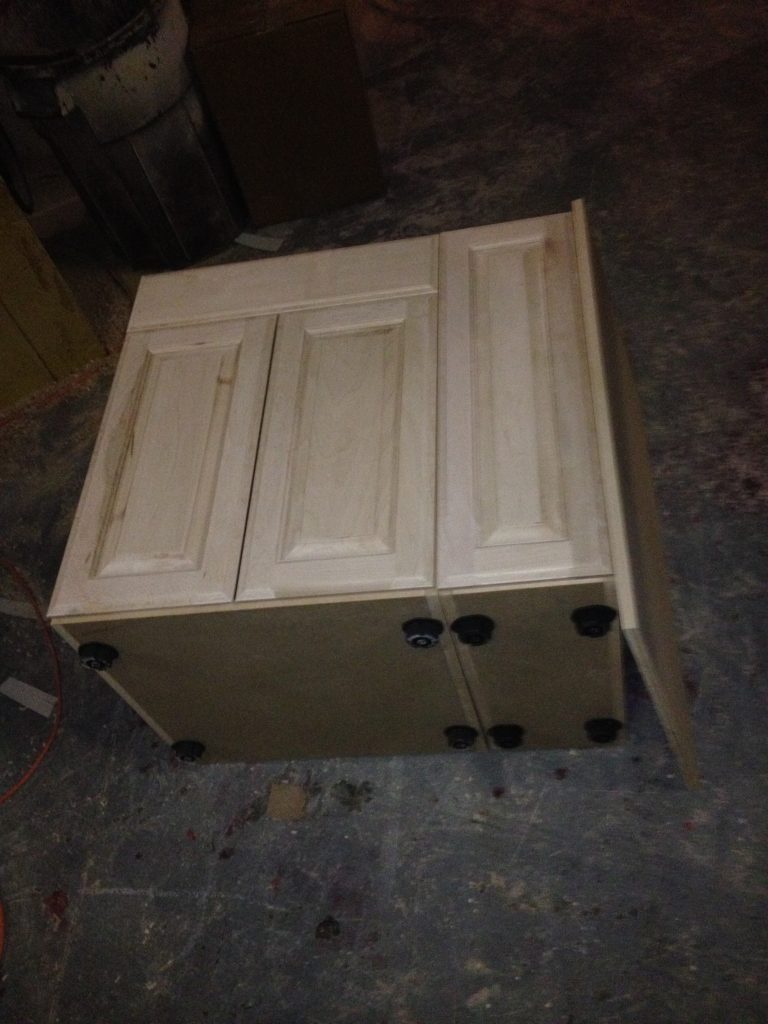
Most cabinets in homes were painted on site and a lot of the time the house painter opens the doors and sprays everything in place. Hinges, drawer slides, everything. The very bottom of the lower doors and the very top edge of the upper doors are hard to spray so they usually don’t get sprayed as dragging the gun that close means the smallest deviation or swerve results in a paint run. The paint itself must be laid on in thin coats to avoid runs and sagging. That does save money on materials but it results in a poor finish. The insides of the cabinets are generally rough and pebbly from overspray.Better finishes are sprayed in a spray booth with the backs off the cabinets so the overspray can be pulled out by the air movement. The backs, doors, end panels, all the flat parts, are sprayed flat then flipped over after they dry for spraying the other side. The hardware isn’t installed so it isn’t covered in paint or lacquer. As the flat parts are sprayed laying flat you can soak the wood with finishing material, hard on the finishing budget but it makes for a more durable finish.
The best part is that while finishing is going on the job site isn’t shut down and the spray booth is a lot cleaner than most construction sites so there is a better paint job. A spray booth allows pre cat lacquer to be sprayed as it is a bit more toxic than regular nitrocellulose lacquer that will turn white with U.V. damage as the sunlight hits it and degrades the finish. Plus with the parts properly finished more moisture is locked out so there is less expansion and
contraction as humidity changes. And of course drawer slides and hinges work better when not covered in paint and it looks much more professional.
The down side is that a finisher with a shop has overhead to pay so he will charge more than a guy that works out of his pickup truck. That is good if a problem develops down the road as you can find the company for warranty work or matching any new work needed in the home. In the end you get what you pay for.
Paint Finishes
On painted cabinets the undercoater, a specially designed lacquer paint that excels at adhesion and bonding to the succeeding layers, is sprayed and sanded after it dries. The wet coating raises the grain, causing small fibers to swell up, causing the surface to roughen. All the parts are sanded with 220 grit sandpaper or sanding sponges to smooth the surface and another coat of tinted undercoater is sprayed on both sides. Then a clear sealer is sprayed over everything.
The sealing locks down the stray fibers and fills some of the pores so when the parts are sanded afterward you get a smooth finish. Sealer also separates any glaze from the raw wood so that you can control the rate at which the glaze “hangs”. Sealer excels at adhesion but it isn’t a durable finishing top coat.
A pre cat lacquer, short for pre catalyzed lacquer, is sprayed as the top coat. Pre cats are factory catalyzed finish, two components clear coats that react with the oxygen in the air and become a polymer, two molecules become one new molecule and the bond is tough to break.
Paint Finishes
- Cheaper wood can be used but the finishing material costs more so it balances out
- Paint can be tinted any color you can come up with
- The undercoater is tinted but the following coats and processes will affect the final look
- Paint can be crackled, glazed, distressed, or shaded
- Lacquer paint is a must, it doesn’t turn gummy like oil based or enamel paint
Pre cat is tough, Craftmade Cabinets claims it is a 40 year finish and that is probably no exaggeration. It does have a shelf life, some thing that you can avoid with a different type of coating called post catalyzed where the second component or hardener, is added to the clear coat or paint right before you shoot the paint. Post cat can harden up in your hoses, pump, and spray gun if you walk off and forget it. Post cat is marginally superior but might not be if the ratios are off a bit so pre cat finishes are preferred by most finishers.
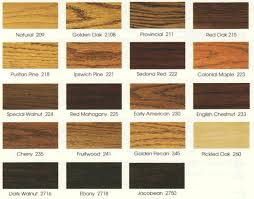
Stain Finishes
Stain colors and the ultimate look of the stained wood aren’t what a lot of people expect. People see a look in a magazine or online and think the right stain will magically turn the wood the same color as the stain in the bucket. The reality is that each wood will absorb only so much stain, that each part of a log and the board that came out of that log, will stain out slightly different, and that there will be shades imparted to the final appearance because of the wood itself.
The amount of heartwood versus sapwood, inner and outer layers of the tree will impact how a wood part will stain as well so there will be a range of colors across a stained kitchen unless it is a wood like oak that has less difference between heartwood and sapwood. But the density and amount of porosity is the main factors in stain absorption.
The annual rings of the boards, the summer wood and winter wood, and how those rings are presented in the board that the part is made from is another huge factor on how the wood stains out. Finally the process used to sand the wood is important, knife finished parts like door edges and crown molding never get sanded, wood veneer is thinner and has a glue layer under it so it will stain out lighter, even the sanding grit used impact how light or dark the stain will set. So it is a balancing act and an inexact process.
Staining wood
- The wood will absorb only so much stain
- Sanding process affects stain absorption
- Plywood, moldings, and shapered edges stain differently
- Stain can’t be built up, one coat only
- If you want it darker than it want to go you have to use another finish layer and another process
There are three types of stain: oil based, lacquer based, and dye stain.
Oil stains are rarely used in paint booths because they gunk up everything as the overspray settles out. It is gummy, not dry like a lacquer product. The rags used to wipe off the excess stain can also spontaneously combust so you have to keep them in a sealed container. The advantage is that oil based stain dries slower so you have more time to wipe the stain off.
Lacquer based stains dry quicker, you can spray sealer the same day if it is warm. You have to hustle because it dries quickly but an second coat will loosen it up if needed. Lacquer based stain has lacquer thinner instead of paint thinner like in oil based stain.
Dye stains are alcohol based and are literally dyes that once soaked in aren’t going to be reversed. You have to have a good quality cup spray gun, we use a couple of Sata guns, because drips aren’t tolerated as the drips will show. The dye is used in very thin layers, slowly built up, so that you have some control over the outcome. Dye stains can be used over other finishes to tweak color or used to remove dominate colors from woods like red oak or cherry.
Glazed Finishes
Glaze is a colorant mixed in a solvent that is used to add some color to a finish. Glaze can be tinted to any color you can come up with starting from a clear base or a standard glaze color.
The solvent used is almost always paint thinner because most furniture and cabinet finish is going to be lacquer and you want a solvent in the glaze that won’t soften or dissolve the sealer it is going on top of. The sealer blocks out mass absorption by the surface leaving scratches, pores, crevices, and molding detail lines as the only place the glaze will remain once you wipe off the excess.
Glaze can be sprayed with a special glaze spray gun but it is usually brushed on and wiped off. You can wipe off 99% of the glaze or leave a bit more, including a general haze on all parts of the surface. Following up with a mineral spirit dampened rag will remove the haze and leave the pores and deeper crevices highlighted. If the base is a white lacquer undercoater that has been sealed the haze will tint the white surface quite a bit. The main thing is to do the process consistently so you have a uniform look.
Alternately you can manipulate the glaze in other ways. Allowing a thick coat of glaze to completely dry before sanding the excess away is one method. If you are using a haze method you can blot with a burlap bag to texture the glaze. or use straight edge razor blades to scrape.
Glazed Finishes
- Any color you desire
- 99% of the glaze comes off to avoid adhesion problems with the top coat
- Technique used determines the final look
- Surface must be porous or scratched to leave crevices
- Paint shades will be changed under the glaze and final top coats.
You can also dry brush glaze. A natural bristle brush is used, usually a hog hair brush, and the glaze is picked up using the brush, then wiped or blotted off on a clean surface till most of the solvent has evaporated. Then the semi dry glaze is pounced on the wood surface or brushed around paying attention to direction just as if you were spreading paint.
Once the glaze has been applied to all the finished surfaces of the part you have to wait at least overnight for the final mineral spirit solvents to fully evaporate or the solvent will get trapped under the top coat and cause adhesion problems. Normally a lacquer based or pre cat lacquer sealer or top coat will “bite” or etch or dissolve into the previous layer but anything between the layers of lacquer will interfere with that adhesion. Which is why glaze is left in crevices, pores, and scratches where the glaze is protected from abrasions. On flat surfaces only a bare haze can be left in place to avoid adhesion problems on the top coat.
Toners
While Glaze is made using a different solvent, toners are made using the same solvent as the top coat or sealer or a fast drying solvent like alcohol. They must evaporate entirely or be able to bite or adhere into the underlying sealer.
You can buy ready made toners from specialty finishing product companies but most shops will make their own using lacquer stain, lacquer paint, and sealer or top coat lacquer. Not all stain contains pigments are suitable for using in toners so always make a sample panel.
The toner is misted on using a quality cup gun like a Sata spray gun or mixed in larger quantities into the sealer or top coat material. Remember that parts will be sprayed from each direction several times to get all the shadowed crevices covered so you can build up more shading in some areas if they get too many coats of the toner..
If you are wanting to knock down the red color in a wood such as red oak, cherry, or sapele you can watch it happen instantly and carefully touch up spots if needed. A single drip or blasting too much on one spot will require stripping the wood back and starting over.
What you need to Know About Toners
- Used to shift the color or shade areas of the finish
- Remove reddish tints from red oak, cherry, or sapele to leave a brown look.
- Match new finished parts to old parts when repairing
- Provide depth in the finish
- Toners can be made using stains or universal colorants
Toners add depth to the top coat. Most lacquers dry out super thin, you don’t see a shiny thick built up surface usually no matter how many coats you apply. The toner allows the light to reflect inside the clear coats and adds depth to the appearance.
Using toners you can take a super cheap wood like paint grade maple and make it look like expensive cherry but it comes at several costs, first is the expense of the extra work and materials, and second, you will have a “fragile” finish that is impossible to repair with a wipe of stain and re-shooting the top coat on the part. It is advisable to use the correct wood to get you closer to the look you want and use as little extra steps in the finish as possible.